Showing posts with label Puppet Posts. Show all posts

Tuesday, February 4, 2025

More Fun and Easy Puppet Theaters for Kids!

        There are many other ways of making stages and curtains. As you manage your puppet theater you will probably invent many different stage arrangements and configurations. The ones given below are simple designs to start with.

Tie string to first ring on each side to make a sliding curtain.

       In the previous post, are the directions for making the sliding curtains illustrated above. You can open them with your fingers or by using a string if you prefer.

Left, is a simple drawing of a folding theater. Right, is a tipped-up table for rod or hand puppets.

       The folding theater made from plywood is for rod or hand puppets. The height of the stage opening from the floor depends on whether you will sit or stand while using your puppets.

Left, illustrated window stage. Center, another chair used for a stage. Right, a constructed house
for puppets to peek outside of the windows and doors makes for a novel theater.

       You can entertain an outdoor audience by using this window ledge stage. It is good for rod, push, or hand puppets. Kneel on the floor or sit on a stool while working the puppets.
       A chair stage made by taping a cloth around the legs and on the back of a chair is good for marionettes. Stand on a stool behind the chair, to work the actors.
       Cut a house out of a large piece of cardboard. Cut holes for doors and windows, and paint the house. Tack it to two orange crates, standing upright, for support. This can be used on the floor or table for your puppet shows.
A stage made from 5 pieces of plywood and a low sofa table.

       If you are giving a play with several actors you will need a friend to help you manage them. Then practice will be more important than ever.
       Decide where each of you will stand backstage. Practice moving your puppets so that they won't become tangled up with each other. And practice your actors' speeches so that you each know when to talk for your puppets. In that way the play will move right along without two puppets speaking at once and without awkward lags of silence. And practice whisking your actors offstage quickly when their turn is over, and getting your new ones onstage. Also practice raising and lowering the curtain and changing costumes and scenery speedily.
How to make a combination marionette and hand puppet stage.
Back up the table against a wall so that the actors don't accidentally
loose balance and fall off of the table! The curtain hangs between
 the crate and the table and the actor pokes the hand puppets from
 beneath the curtain at the bottom.

       If you are giving a marionette show you will need to stand high enough to manage the strings easily without raising your arms. Professional puppeteers stand on a raised platform called a "bridge." Chairs, a table or a bench are fine for this, so long as they are strong enough to hold you and your partner and are the right height so that you can work comfortably.

Designing Children's Puppet Theaters Quickly

        The easiest kind of stage is so simple that it can be made in a few minutes. You can use it for push puppets or rod puppets.

Use a comfortable chair to hide behind while your puppets peek over the sides and top.

       Put a table near the wall of the room, cover the front of it with a cloth reaching to the floor, so that nothing behind it can be seen, and the stage is ready for the show.
       The audience sits in front of the table and the puppet theater manager, called the ''puppeteer,'' sits or kneels on the floor in back, unseen. He reaches up and move his push puppets or rod puppets as he speaks their lines.

This child is using a simple table for his hand-puppet theater.

       And here's a tip for you, the director: When puppets act, only the who is speaking moves. The others stall sill. In that way the audience is always sure which actor is talking.
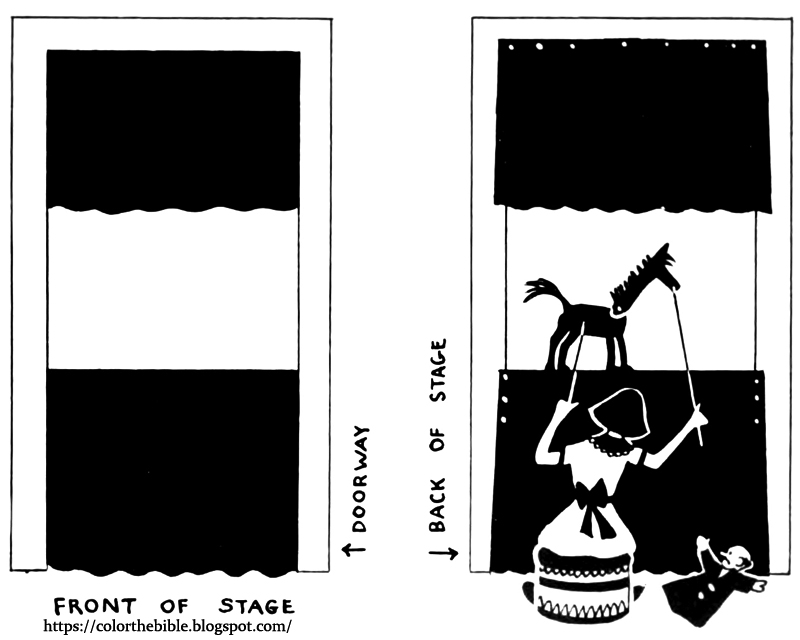
       To make a simple doorway stage, used for hand puppets or rod puppets, hang a short curtain so that it falls from the top of a doorway between two rooms. Leave a twenty or thirty inch opening. Then hang another curtain down to the floor.

Left, is the front of the stage and right is the back. This stage is made from a doorway.

       The audience sits in the room before the curtain while the puppeteer, behind the lower curtain, reaches up and works the actors in the opening. You can make the opening at the height that is most convenient for you.
       You don't need an opening and closing curtain for such a stage. Just be sure that your actors go off at the right time, as they do in a real theater, instead of bobbing suddenly in the middle of a scene. 
       However, most audiences like the excitement of a curtain opening and closing, so you can make one very easily. Take two pieces of colored cloth, almost any kind, each a little longer and much wider than half the width of the stage opening. Sew rings about two or three inches apart along the top edge. Now run a wire through the rings and make it very tight with tasks on each side, right under the top curtain. You can open and close the curtains from behind by pulling the rings along the wire.

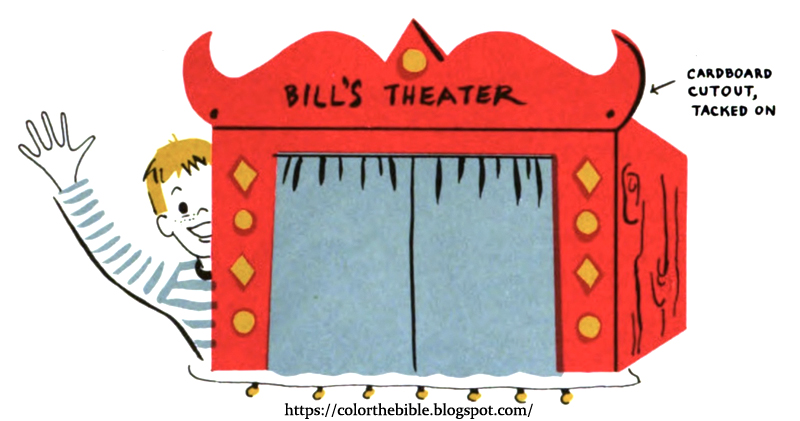
Bill's Theater is made from a cardboard box.

       This stage above, made from a box, should be in proportion to the size of the actors, so keep them in mind when you are making it. A puppet stage should be a little over two-and-one-half times the height of the actors. If a puppet is eight inches tall, the stage on which he plays should be about twenty inches high.
       You can make stage curtains by cutting two pieces of cloth - each mush wider then one-half of your stage and a little longer than it is tall. Hem these, sew rings on the top edge, run a wire through the rings and stretch it tight across the top of the box stage. The curtains should come just to its floor, when finished. When you open and close these small curtains, be sure to keep your fingers up high, out of sight behind your big doorway curtain. Make it all seem like magic to your audience out front.
       If you wish, you can place a fancy cardboard cutout across your stage, near the top, lettered with the name of your theater. You can make other additions, too. A chain of Christmas lights might make footlights, and lights around the outside of the stage. It is dramatic to dim them just before the performance begins!

A Stage Design for Marionettes That Children Can Build

        String marionettes need a different kind of stage - one they can walk behind and dangle puppets down inside. Such a stage is simple to make.

Left, For stage, remove front and top of box, and paint.
Right, where to hang curtains in front.

       Put a table across a doorway. This holds your stage, which can be a sturdy large box made from wood or heavy cardboard. Remove both the top of the box and it's front also. Paint and decorate the interior of the box nicely using scenery that will suit your play or performance.

Left, This stage needs hanging curtains at the top and bottom.
Right, Hanging curtains tacked to top of the doorways.

       Now make a doorway stage around the box stage. The curtains hanging from the top of the door should reach a little below the top of the box. The lower curtain must hang from the floor level of your stage to the floor of the room. If the opening of the door is wider than the box, place the box in the center of the doorway and fill in the gap on either side with a hanging curtain. Set the box far enough back so that the actors have room to enter from either side. There is your stage, a small image of a real one, where your Marionettes can perform.
       The audience sees nothing of what the puppet manager is doing backstage. It sees only the puppets on stage.

Nail the outer most curtain at the top of the door to hang over the middle curtains.