Showing posts with label Egg Hunt. Show all posts

Friday, April 18, 2025

How to stuff an Easter egg for an egg hunt...

Here's a little egg for
your church webpage!
 Happy Easter!
How many ways are there to stuff an Easter egg for a successful hunt? I'll add more ideas as I think of them, folks.

  1. Treat you 'egg hunt' like a potluck. Have every family hunting in attendance bring a certain number of eggs for hunting. Then the sponsor of that egg hunt hides the eggs secretly prior to the egg hunt. 
  2. Stuff plastic eggs with printable scriptures. - especially if the hunt is at a church! include these along with treats.
  3. For older kids and adults - among your eggs, stuff the green ones with cash money!
  4. Dad creates beeping Easter egg for blind daughter here. and his website.
  5. Have a 'rubber duck' hunt on a lawn instead of eggs. Number the ducks with a permanent ink marker on their bottoms. This prevents kids from collecting something off of a lawn or public park that may get dirty and you don't want them to handle it before eating candy. They can pick up rubber ducks and exchange these for gifts. Then wash the ducks or soak them in vinegar and water for the following years. Bulk rubber ducks here or here. (These are also useful in fair, floating in a kiddie pool.)
  6. The original Jelly Bean Prayer to include inside of an egg including jelly beans
  7. Organize hunts into color matching for specific visitors. Each person may only collect one egg color and in this way the gifts are made personal and every person hunting gets the same amount of eggs.
  8. Stuff plastic eggs with scripture candy here!
  9. Always have a 'golden egg' with the greatest prize and hide it seriously. Make this egg very difficult to find. When my dad was little, the town had egg hunts and the golden egg usually had a money gift for high school graduates. It was usually hidden in the wooded public park.
  10. Have a scavenger egg hunt where each egg contains a clue that will lead them to a destination for another clue and so on until... a big prize is collected.
  11. Peeps for stuffing eggs, very traditional. 
  12. Egg hunts for children confined to wheel chairs may be done with colorful egg shaped balloons filled with helium and paper tickets. Tie a weight to the end of each balloon string so that these won't get caught by the wind and blown away. The child may then pop each balloon with a toothpick and turn in their tickets for prizes after the hunt.
  13. How a church holds community Easter egg hunts for different age groups...
  14. Include riddles for clues that leads to candy or more hidden eggs.
  15. Number eggs so that if someone finds it they can retrieve candy or prizes from a cleaner location, with the same number.
  16. Have an 'egg glow' egg hunt at night instead of having the hunt during the day! 
  17. Print out fun facts about Easter and kids can use these tips to help them complete a crossword at a dinner party later.
  18. Purchase sidewalk chalk shaped like eggs for little ones to draw and play with later.
  19. Mumsnet hints for a successful hunt at home...
  20. Dogs love egg hunts too; fill the plastic eggs with your pet's favorite treats! You can even hide a few hard boiled eggs with their shells peeled off of course.
  21. Share the Good News and pretzel treats to your Easter eggs from rosaenid
How one church hosts egg hunts indoors when it rains...

Thursday, April 17, 2025

The Big Egg Repaint

Sitting on top of my desk, is a faux sugar egg and other vintage looking Easter decorations.

This needs a few coats of paint; I think.
       I purchased this large Easter egg from a dollar store. But it was not particularly attractive at all. However, it was much improved with a new base coat of chalk paint. Then I painted the raised areas with brighter colors and coated the entire egg with Mod Podge and transparent glitter. I think it looks very much like a giant sugar egg now!

More About Real Sugar Eggs:

Craft goldfish shaped eggs for Easter this year!

Goldfish swimming on air, 
hanging on the branches of
an egg tree.

       Use both traditional egg dyeing techniques combined with a cooking oil dyeing method to craft these unique gold fish for your Easter egg tree! I think these eggs will be some of the most stunning on our egg trees in the future!
       I also chose to use a color palette similar to the original in real living goldfish, however you may choose to use any color combinations you wish. These little marbled creations would look just as nice in blues, lavenders and pinks...

First Application: Dying the Easter Eggs Traditionally: you will need the following supplies: food dye, white vinegar, pot of boiling water, a variety of heavy mugs and paper towels.
  1. Blow out your eggs by inserting a sterile tack or pin into both ends of the eggs. Use a small toothpick or skewer to slightly widen these holes and to also break-up the yolk sacks. 
  2. Place your lips around one end of the egg, hold it over a bowl and blow through the hole until all of the contents come through the opposite end.
  3. Boil these empty eggs in a pot of clean water over the stove to clean out the remaining contents of the eggs. 
  4. Let the eggs dry and the water drain on to a paper towel before dying. I used three of brown eggs along with four white ones for my set of goldfish.
  5. Make an ordinary dye bath using food color and a couple of tablespoons of white vinegar to set the dye. I started with orange and then let the eggs in that dye at varying degrees of time. 
  6. I left two of the white eggs and one of the brown out of this first part of the process altogether, so that the modeling of white and brown might be more distinct in the second part of their dying.
These eggs have been dyed twice and have also had bits of black tissue paper glued to their
surfaces in places.

 
Second Application: Altering the egg dye further: you will need additional food dye, paper towels and some kind of cooking oil.
  1. Pat dry all of the eggs before continuing with this second step.
  2. Add two tablespoons of cooking oil to the surface of your egg dye, plus additional red color. 
  3. Now roll all of the eggs across the surface of this dye. You may wish to limit how much contact the eggs have with the oil stained dye. I wanted my eggs to have a very distinct marbling as do many goldfish. 
  4. I then added several drops of blue to the dye and rolled four of my eggs into this briefly. The effects were stunning but I still could not achieve a black spot where I wanted them. So I decided to add these to the egg surfaces using a black tissue paper at the end.
  5. The white spotted surfaces on two of my eggs looked marvelous. These were the two that had not been dyed in the first bath at all, nor had I included them in the bath with blue dye in the end.
These goldfish are dyed, empty egg shells. Their tails are made using cupcake liners.

Third Application: Turning the eggs into goldfish or carp: you will need the following supplies: Styrofoam beads for barreleyes, tissue paper, black acrylic paint, white school glue and/or cupcake liners for the tails and fins (I chose to use cotton batting for the side fins. But it would be more consistent for young students to use cupcake liners for all of the fins and tails)
  1. I ripped a small amount of black tissue and applied a few selected areas with a smear of white glue and tissue. 
  2. I also did the same with a white tissue to a few of the brown eggs.
  3. Then using an Exacto knife, I cut some large Styrofoam beads in half, and applied these on either side of each egg to mimic the barreleyes of goldfish. If you are working with a young child, the adult will need to cut the beads in half for the child because of the sharp blade. 
  4. The white glue will hold the eye in place relatively well but the application must be aloud to dry in place until the adhesion is set. 
  5. Next, glue on shredded tissues for fins on the sides and or bottoms of your goldfish. Some goldfish do not have fins on top or bottom, some of them do.
  6. Applying the tail may prove to be a bit tricky. It is best to do so by gluing on an additional half bead at the place where the fish tail will be wrapped. Let the bead dry in place.
  7. Then wrap the tail by removing the center of the cupcake liner and then twirling it about the side surface of the foam bead along with glue. 
  8. An adult may choose to do the tail application for a child if this proves difficult. However, the end results are adorable!
  9. I painted two of my goldfish tails; one black and the other copper.
  10. Paint a black spot in the centers of each goldfish eyeball. 

I dyed a few of the goldfish black and copper.

Fish out of water belong on egg trees.

Goldfish have distinctive barreleyes made with Styrofoam beads and cotton batting.

How to make an egg-shaped pineapple...

Pineapple shaped from egg.
       To color this fruity, tropical egg, you can use a common spice found in many folks' cupboard. I dyed this fun pineapple egg using turmeric powder! If your turmeric is too old, this is an excellent way to use it up and replace it with newer versions, dried or fresh.
       As you can see from the photograph, I got a little carried away with the tissue paper texture on this egg and covered much of the dyed surface. This, of course, is not necessary for those of you who wish to show off more of the naturally died egg. Sometimes stuff just happens and I get a little 'carried away' with an egg, sorry.
       To make an egg like this one or a simpler pineapple variation with less sculpting and simpler lines you will need the following supplies: watercolors, ribbon or wire to hang the egg once it is fully dry, Mod Podge for the turmeric dyed surface (essential, folks.), one cotton ball per pineapple egg, white school glue, one large green pom pom, hot glue and hot glue gun, and yellow tissue paper. 

The eggs above are dyed using turmeric spice.
 Step-by-Step Instructions:
  1. Use a clean tack or needle to pierce the narrower end of a fresh, raw egg. For the pineapple design the egg will need to have a relatively large opening so, you don't need to be very concerned about making the hole tiny this time. Just tap this end firmly on a hard surface and pull out a 1/2 inch opening.
  2. Empty the egg contents into a dish or skillet and eat it right away if you wish.
  3. Submerge the egg shell in a small pot of hot water including a couple of tablespoons of both white vinegar and turmeric. Boil everything gently for no less than ten minutes. You may also let the egg(s) stand in the natural dye bath for much longer after boiling for even more intense color.
  4. Let the egg shell dry completely prior to stuffing it with one cotton ball.
  5. Hot glue on the green pom pom at the top to represent the palms.
  6. Glue on crumpled yellow tissues to intensify texture on the egg.
  7. Now paint the details of a pineapple using watercolors.
  8. Attach a string for hanging by hot gluing it inside of the pom pom.
More Ways to Craft Pineapples:

Wrap a hatching chic with chenille yarns...

Playful hatching chic among other vintage Easter toys.
 
        This chenille yarn wrapped chic is very easily made with only a few supplies: one large plastic egg, masking tape, ribbon for a hanger, both yellow and white chenille yarn, two black pom poms, Sculpey and white school glue.
       Open the plastic egg and insert a ribbon for the hanger; knot this on the inside of the egg. Shut the egg and cover the entire outside surface with masking tape. This will make it easier for the yarn to stick to the egg. Smear on glue and wrap the egg with yarns as you go. I wrapped the lower half first with white chenille yarn and then the upper with yellow chenille yarn. Paste on the black pom poms for eyes and then shape a little beak for the chic using Sculpey or any other oven-bake clay you have on hand. Glue this beak on and hand the big hatching chic from an egg tree branch or display it inside of a child's Easter basket.

Left, the egg ready for yarn application. Right, the lower white yarn "shell" of our chic.

Easter egg shakers for kids!

Four different sides to my sample rattle or 'egg shaker.'

       Egg shaking toys are very old-fashioned. At one time crafters even filled real egg shells with their contents 'blown out' instead of the plastic egg type used here. 
       Very young children, four or five years old, love to play with egg shaped rattles and dance to music at the same time in the classroom. I have also linked to similar crafts to this one at our family Easter blog below. There are enough instruments to start your very own preschool band if you like...

Supply List:

Left, plastic spoons, rice filled plastic
 egg and masking tape.
 

  • two identical plastic spoons, (I will need to cut the bottom off of mine.) 
  • one plastic egg
  • dried rice or beans
  • masking tape
  • Mod Podge and white school glue
  • Decorative rice paper or wrapping paper
  • newsprint
Step-by-Step Instructions:
  1. First assemble the basic shaker by filling a standard sized plastic egg with either uncooked rice or uncooked beans. Just fill the lower half of the egg only.
  2. Shut the egg and tape it all around its perimeter.
  3. Now nestle the egg between the plastic spoons with the narrow end pointed down. Mask the egg tightly between the two spoons. see photo below.
  4. Even the ends of the spoons if one is slightly larger than the other. You won't need to do this if you are using two identical spoons.
  5. Tape all surfaces firmly together using the masking tape.
  6. Crush newsprint onto and into the crevices of the spoons in order to even-out the surfaces and make the rattle look smooth. 
  7. Then cover the exposed newsprint with additional masking tape.
  8. Brush on Mod Podge and smooth on decorative papers to finish the rattle. 
  9. Add another layer of Mod Podge to seal the end product for durability.
  10. Tuck the egg rattle inside of an Easter basket as a gift to a younger child.
Above photos in step-by-step process of wrapping an egg shaker.

    Wednesday, April 16, 2025

    Simple Washi tape eggs . . .

    These handcrafted Washi tape eggs are excellent alternative egg crafts for a preschool or
    kindergarten Sunday school classroom because they are both easy to make with little cleaning
    up afterwards. Teachers may also choose to apply the background papers ahead of time
    for the very young students.

           Washi tape comes in thousands of different patterns and colors. The Washi tapes I used for the above cardboard eggs have transparent backgrounds. I prefer these backgrounds because you can alter the background paper colors in combination with the dots and lines to make endless variations in egg designs. 
           The paper I used for these two examples were green and lavender. Print and cut out patterns for flat cardboard eggs here. Then cover these with white school glue and paper. And last, use the Washi tape to embellish your Easter egg craft without fuss or mess!

    Tuesday, April 15, 2025

    How to dye a 'Teddy bear' egg

    Teddy Bear Easter egg for little ones taking a break next to a very hungry caterpillar!

           Use a coffee dye for the first part of this Easter egg craft and then secondly, paint and glue on the features of a teddy bear that any young child will delight in.
           To make the coffee dye simply boil several tablespoons of instant coffee and white vinegar on the stove with a cup full of water. Then soak the mixture along with either a hard-boiled egg or one that has been blown out in advance overnight. To get a rich chocolate brown color the egg must be left in this mixture for over twelve hours!
           Then hot glue on a few fuzzy pom-poms for the ears and nose and other facial features...

    Left, a blew out the contents of my brown egg through two holes, one at each end of the egg.
    Right, then I soaked the egg in a coffee dye over night in order to get the rich dark brown you
    see above.

    Monday, April 14, 2025

    How to shape a 'crown of thorns' for Easter displays and egg trees!

            To make this small crown of thorns for an egg tree you will need the following supplies: five or six chenille stems, cotton balls, white school glue, acrylic paints (brown and pink).

    Step-by-Step Instructions:

    1. Unravel the cotton balls, for this small crown I used approximately five of these. 
    2. Squeeze a fine line of white school glue down several inches of the edge of a chenille stem.
    3. Wrap the cotton batting fuzz about the glue covered area of the stem tightly with the tips of your fingers. Proceed down the stem with this method until all the it's length is covered with cotton batting.
    4. Repeat step 3 several times.
    5. Now twist the stems together in a random loops to make a twig looking crown.
    6. Cut and twist a thorny looking hook somewhere on the crown form for hanging.
    7. For the last two stems, cut small sections of one stem and twist these onto two other chenille stems to look like thorns. 
    8. Twist the thorny stems about the crown and set it aside to dry.
    9. Once dry the crown of thorns may be painted with brown acrylics. I added touches of pink and purple glitter sparingly to the painted brown stems too.

    Left, the original cotton batting version of a crown of thorns for the Easter egg tree.
    Right, a painted crown of thorns painted to look like real ones.

     The Crown of Thorns:

    Friday, April 11, 2025

    Craft Speckled Easter Eggs!

    These speckled eggs are made with food dye and uncooked rice.

     
    Supplies for making speckled eggs.
           Their are several ways to 'speckle' your Easter eggs with dye or paint, however, this is the cleanest way to do it with little children in my opinion. 
           You will need the following supplies to get started: tongs, rice of any color, plastic sandwich bags (one per color), food dye, white vinegar, eggs, and a pot of water for stove.

    Step-by-Step Instructions:

    1. Boil the number or eggs of your own choice in a pot of water.
    2. Once the eggs have boiled for 10 minutes, let them cool slightly in that water and add a couple of Tablespoons of white vinegar to that same water.
    3. Now fill each plastic bag with about 1/2 cup of rice. You will need a bag for every color you wish to make.
    4. Add four to five drops of food dye into one bag of rice along with a warm egg (in shell).
    5. Seal the plastic bag carefully and then shake it's contents together until the desired degree of speckle is transferred to the egg.
    6. Repeat the steps for each color separately.
    7. You may repeat the process by coating the eggs with multiple colors and you may continue to add dyes to the rice to intensify the speckling.
    8. Toss the rice out when you have finished.
    9. Keep your eggs refrigerated until you are ready to eat them for Easter brunch.

    Left, use tongs to insert the boiled eggs inside of the plastic bag if these have not cooled enough
    before dying. Squeeze 5 or 6 drops of food coloring on top of the rice before sealing the bag.
    Right, now for the fun part. Toss the egg and rice back and forth between your hands until it
    looks they way you want.


    See our speckled eggs in white, green, red and blue.

    A crafty way to transform egg designs into baskets...

    Egg shaped baskets hang from a early blooming pink dogwood tree.

           To make eggs like these you will need the following supplies: a paper egg pattern, light weight cardboard, scrapbook papers, embroidery floss, white school glue or tacky craft glue, wire for hanging and straw flower embellishments.

    Step-by-Step Instructions:

    1. Swipe a flat paper egg pattern to your desktop and then print it out from your home computer/ laptop.
    2. Cut out the size you need and then transfer it to cardboard. 
    3. Form the handle of the egg shaped basket by removing the top half of the egg shaped cardboard cut-out.
    4. Repeat steps two and three, excluding the handle.
    5. Glue together the two bottom halves to form an open shallow pocket for the egg shaped basket.
    6. After the cardboard basket is completely dry, cut from plaid scrapbook papers and decoupage these images onto the lower sections of each basket.
    7. Smear more glue onto each handle and then carefully wrap colorful embroidery floss around the handles of the baskets. 
    8. Paste straw flower embellishments inside of the shallow basket cavities.
    9. Wrap on a wire hook to hang these egg shaped baskets onto Easter egg trees.
    Left, cut-out the cardboard pieces, Center, double up on the lower basket to paste two together.
     Right, decoupage plaid scrapbook paper onto the lower halves of each basket.

    Sunday, March 30, 2025

    Refinish an egg with a feather or two...

    Pale green and white speckled eggs with feathers glued to their surfaces.

            These factory-made speckled eggs were refreshed with just a small swipe or two of Mod Podge and speckled brown feathers. They took only moments to reinvent! Try doing the same in a variety of colored feathers and eggs. 
           Once I paint the basket shown below, I will include an updated version of it for visitors to see at a later date. For now it is white and will trim an egg tree along with other soft green and white eggs and things...

    An egg is nestled inside of a cotton batting, bent 'ivy' basket. This is what the basket looks like
    before it is painted to look like ivy. Some people prefer to keep their cotton baskets unpainted.
     If I were to hang this basket on a Christmas tree, I would dust it with glitter
      and twist on a few berries.

    See another version of the faux ivy basket painted with the colors of Lent
     and then filled with green moss and a speckled quail's egg inside of it.

    Craft Cardboard "Resurrection" Eggs . . .

    Cardboard 'Resurrection' eggs displayed on thorny shrubs.

            These cardboard eggs are both simpler and more economical for young children to assemble than the version I have described at my Easter blog. I have also included a variety of butterflies and a moth below that young students may print out on their home computers.
           To make cardboard eggs like these you will need the following supplies: cardboard, an egg pattern, decorative scrap papers, white school glue, small twigs collected from outdoors, green acrylic paints, a few cotton balls, string for hanging, a chenille stem and butterfly/moth clip art.

    Left, shaping pupa with cotton on a chenille stem. Right, the chrysalis/pupa still need green paint.

    Step-by-Step Instructions:
    1. Cut out the egg shape from scrap cardboard.
    2. Cover both the front and back of this egg with scrapbook papers. Some children may wish to choose to cover their backgrounds with a sky blue paper or a photo of the sky with clouds from a magazine. Other children may choose to interpret their "resurrection'' eggs with more artistic license and select any kind of decorative paper for this vignette. Either choice is fine as long as parents or teachers teach the symbolic meaning associated with the transformation story. I've included links to these below.
    3. Cut out a butterfly or moth to paste onto the egg. Alternatively, teachers could purchase butterfly stickers for the craft in advance to stick onto the egg.
    4. Now puddle the glue and adhere a small twig to the egg. Let dry.
    5. Cut a one inch segment of the chenille stem. Bend one end piece of this stem slightly.
    6. Unravel the cotton ball, only one of these per student will be necessary if that much.
    7. Squeeze a tiny bit of glue along the bristly edge of the cut stem and wrap the stem with the cotton batting. Repeat this step until the stem is shaped to look like a chrysalis, the pupa of a butterfly or moth. If you feel this method is a bit too fussy for very young children: you could shape this pupa from air dry clay or find a photo of the butterfly chrysalis to print and paste onto the egg.
    8. Puddle the glue a bit to get the pupa/chrysalis to stick to the cardboard surface.
    9. Brush on Mod Podge coating last to preserve the egg surface, twig and chrysalis.
    10. Punch a hole into the egg, to string a twine or ribbon through it so that little ones may hang the egg in a display or on an egg tree.

      See the cotton batting chrysalis up close.

      More versions of Resurrection eggs with the butterfly symbol.
       
    What do caterpillars, butterflies, eggs and pupa have to do with the Resurrection?

    Saturday, March 29, 2025

    Decoupage Wild Birds On Eggs

    "God created the great sea monsters and every living creature that moves,
    with which the waters swarmed after their kind, and every
    winged bird after its kind;..." Genesis 1:21

           The birds shown in the photo above were decoupaged onto flat, egg-shaped, cardboard cut-outs using magazine pages and a bird book cover from a child's ornithology text book. To make some eggs similar to our own you may download printable birds from the samples restored under my Paper Doll Workshop page.
           "The common name for a bird in the Hebrew Scriptures, is tzephur, the rapid mover, or harrier; a name very expressive of these volatile creatures. A more general and indefinite name is ouph, a flier; but this appellation denotes every thing that flies whether bird or insect. It is frequently translated "fowl" in the English Bible. A bird of prey is called oith, a rusher, from the impetuosity with which is rushes upon its prey. In several of the passages where it occurs, our translators have rendered its plural form by "fowls."

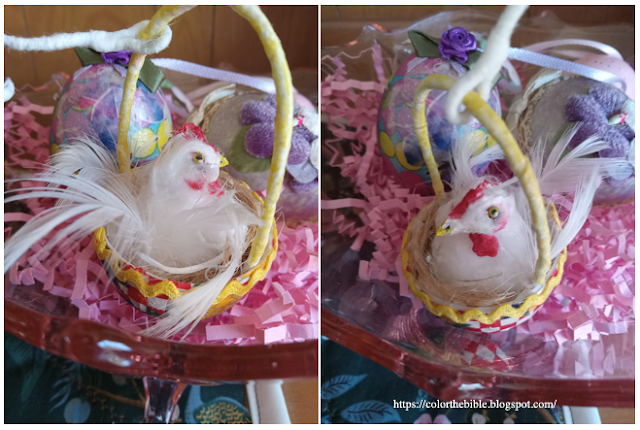
    'Nesting Chicken' Easter Egg

    Little hen nesting in an Easter egg.

           Turn a half egg into a grass-lined nest for a hen. This makes a clever little ornament to hang on an egg tree at Easter or if you prefer, on a Christmas tree.

    Supplies Needed:

    • A plastic egg, just lower half
    • 3 cotton balls
    • white school glue
    • masking tape
    • one chenille stem
    • a few goose down feathers or white feathers
    • watercolors
    • dried grass to line the 'egg' nest
    • decorative paper and trim for the egg

    Step-by-Step Instructions:

    1. Open the plastic egg and keep only the lower half for this particular craft. 
    2. Cover the entire part of the egg with masking tape, neatly smoothing out wrinkles with your thumbnail as you go.
    3. Decoupage decorative paper on the outside of the egg. Let dry.
    4. Attach a handle to the inside of the egg using masking tape.
    5. Puddle the glue on the inside and line the egg with craft grass of some kind.
    6. To shape the hen, cut from a wire two inches and bend the tip into a 'hook' shape as seen in the photo below. 
    7. Wrap the wire with a fine layer of glue and twist the cotton batting onto it in layers to shape a hen's beak, head, neck and body.
    8. It is not necessary to add or shape the legs of the hen as she is in the seated position, tucked into the dried grassy nest. Puddle the glue generously and tuck her down into the nest.
    9. Let her dry in place before adding down feather where her wings and tail should be. 
    10. Shape the comb and paint this with red watercolor. Glue it on.
    11. Paint the beak yellow and then the eyes.
    12. Shape a fancy hook from the left over wire.
    How to shape the head and neck of the hen from wire and cotton.

    Steps for assembling the egg basket and pasting in the parts.

    A soft, small hen nestled inside the lower half of a decoupaged Easter egg makes nice addition to egg tree.

    "Which came first, the chicken
     or the egg," sung by Mike Stewart

    Wednesday, March 26, 2025

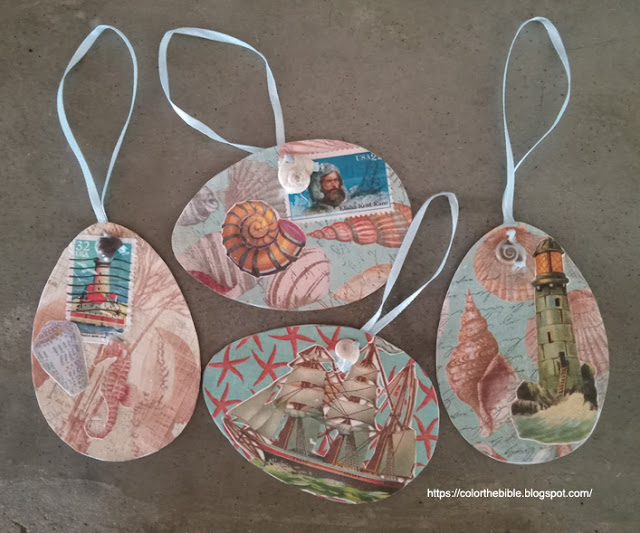
    How to make maritime scrap collage eggs . . .

    Decoupage flat eggs with Maritime themes for the Easter egg tree.

           Cardboard egg cut-outs with sea or ocean themed subjects. I used the following items to embellish these scrapbook egg ornaments: blue ribbon, tiny real shells, nautical stamps, reprints of Victorian die cuts and Mod Podge. Below are a few of my own printables that students may use to craft their own versions, if the like.

     Step-by-Step Instructions:

    1. Cut out cardboard shaped eggs.
    2. Glue on decorative papers to both sides. 
    3. String blue ribbon through a hole inside a real shell (puka shell) and then through the top of each egg.
    4. Apply a generous amount of white glue to the shell hanger to prevent it from working loose from the hole.
    5. Brush on Mod Podge to add stamps, die cuts and any other interesting pictures or text to the maritime egg creations.
    Antique shell paper

    Etching of ships

    Sailor boy die cut

    The 'Unbreakable' Easter Eggs

    Two plastic egg versions decoupaged with yellow
    and green tissues and trimmed with ribbons.

           The 'unbreakable' egg in this instance will not be totally lost if it falls from the branches of an egg tree; it will, however, break if you run over it with a truck. So, I guess it is still breakable but just not in all instances like the common egg! And as always, the abilities of the crafter are more apparent within the aesthetics of the resulting egg. For some this process is heavenly, for others it will look like a 'hot mess.' Just keep practicing...

    Supplies Needed: 

    • plastic eggs
    • masking tape
    • tissue papers
    • decorative trims
    • tacky craft glue
    • Mod Podge
    • ribbon, twine or wire for hanging
    Left, see tiny holes at the top and bottom of the eggs; you can thread a ribbon or twine
    through these holes to hang the eggs from an egg tree. Right, large plastic eggs used
    for decoupage from our local Dollar Store.

     Step-by-Step Instructions:

    1. First insert the hanger for your eggs through the wholes provided at one of the ends of the egg. You can hide the knot if you like on the inside of the egg so that it will not be seen. Then pull the hanger up through the outside of the egg.
    2. Snap together the two halves of your plastic egg and use masking tape to keep the seam closed.
    3. Cover the entire surface of the plastic egg now with masking tape. Use the tip of your finger nails to smooth out wrinkles and creases made by the tape.
    4. Using small amounts of white school glue or Mod Podge, apply the tissue wherever you find it pleasing. Do cover the entire surface with the tissue. This process takes time because you must wait for areas of the egg to dry before moving on to other areas to cover. 
    5. Once all of the egg is decoupaged, glue on the fancier trims if there are any.
    6. Mod Podge the entire finished tissue surfaces of the Easter egg left exposed.
    7. Hand your creation from anywhere on an egg tree. If it falls off the branches, this particular kind of egg will not break as will an actual egg.

    Monday, March 24, 2025

    Strawberry Easter Eggs

    Strawberry eggs displayed with grass and pedestals.

          The gradient on these eggs is produced by leaving the lower sections of the egg in the red dye for longer periods of time, gradually removing the dye so that the upper-most sections are pinker to white. To make a perfect strawberry egg one must use a bit of timing and have a handy eye-dropper or nasal aspirator to help the process along the way... The more gradual the color change is from one end to the other is what folks predetermine to be superior dye job. However, I'm not such a stickler about Easter eggs. I like them all really and have enjoyed eating them perfect or not!
     
    Left, hard boiling white eggs. Center, gradually remove dye with aspirator. Right, polished with
    cooking oil and ready to eat.

    How To Make Perfect Strawberry Easter Eggs:
    1. Hard boil a set of white eggs prior to the dying process. Let them cool but do not remove the shells.
    2. Make the egg dye with red food coloring only. Boil in the kettle approximately one and a half cups of water. You will need only as much water as is necessary to cover one egg entirely after it is  submerged in the dye bath. 
    3. Pour approximately one cup of the boiling water into a heat proof mug or dish.
    4. Add one Tablespoon of white vinegar to the water in the mug.
    5. Add 5 to 6 drops of red food dye into the water and stir. It is important that you make this dye very bright red. Have a second empty mug next to the one filled with dye so that you can save the dye removed for another strawberry egg.
    6. Now submerge the white egg into the red dye with the narrow end pointing up.
    7. Using an eye-dropper or aspirator to suck up just enough of the dye to reveal the tip of the egg after only a few seconds. This will be the whitest or palest part of the strawberry egg once the dying process is finished. Discard the extra dye into a spare container and repeat the removal of dye in the same way every few minutes. The egg will eventually be turned right-side up once the dying is done.
    8. Let the eggs air dry on a dish towel.
    9. Draw the tiny black seeds on the eggs using a black permanent ink pen.
    10. To add the caps, Mod Podge small green leaves to the wider top end of the strawberries if you prefer. I don't usually add the caps. I nestle these strawberry eggs inside of green cupcake liners at each brunch plate.
    11. Rub on a very light coating of cooking oil, using a paper napkin, to give the eggs a slight shine.
    12. Refrigerate till the next morning, Easter Sunday.
    13. Decorate an Easter brunch table with these eggs, crack to open and peal shell off.
    14. Crumble the hard boiled egg, sprinkle with salt and pepper and eat promptly with hash browns and sausage!
    More Strawberry Themed Crafts for Fans of the Fruit:

    Puzzle Eggs and Game Extension Ideas

     Make learning fun for your kids this Easter with this inexpensive handmade gift for Easter baskets.

          Here is a new twist on an old idea, craft egg puzzles for children ages three through seven, using multiple decorative papers and eggs shapes cut from heavy poster board. You will also need white school glue and a sharp pair of scissors. 
          Start teaching with just one egg puzzle then gradually add more eggs to children's egg puzzle collection with different patterns. 
           Store all of the egg puzzle pieces together. Then children will need to separate related patterns and colors from that group before beginning to assemble each egg. Both the sorting activities and the fitting of pieces together are excellent practice for early readers!

    See how the eggs are cut into puzzle pieces.
     
    Step-by-Step Instructions for Parents/Older Siblings:
    1. You can use any flat egg template to make your own versions of these egg puzzles or draw your own. Eggs don't need to be all the same size either; these may vary in size and proportion.
    2. Cut out the egg pattern, trace around it on top of poster board. Repeat and cut out as many eggs as you like.
    3. Brush on white school glue to one side of the poster cut outs. Press on colorful wrapping papers or decorative scrapbook papers. Use only one kind of printed wrapping paper per egg. The more distinct the papers are from each other, the better. Remember these puzzles are for children ages three to seven.
    4. To increase the difficulty of putting the puzzles together you can: multiply the number of eggs, mix the pieces together in the same box/bag, make the pieces for each puzzle smaller or increase the number of puzzle pieces included for each egg. Watch your child putting the eggs together closely in order to determine what changes to make for this game in the future.
    5. Decoupage a small box or sew a simple draw string bag to store the handmade egg puzzles together. Gift them for Easter in a basket if you like.
    More Puzzle Crafts: